Wednesday, July 20, 2011

Talavera and Italian Countryside...

We are outside on the porch and I wanted to show you a table I set for the "porches and deck" blog party earlier this summer.

This is a really simple table with everyday items...


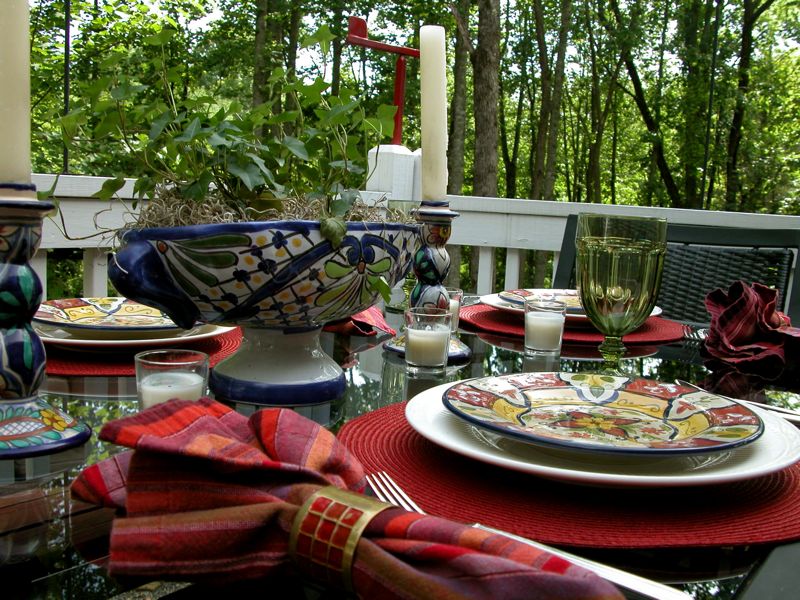
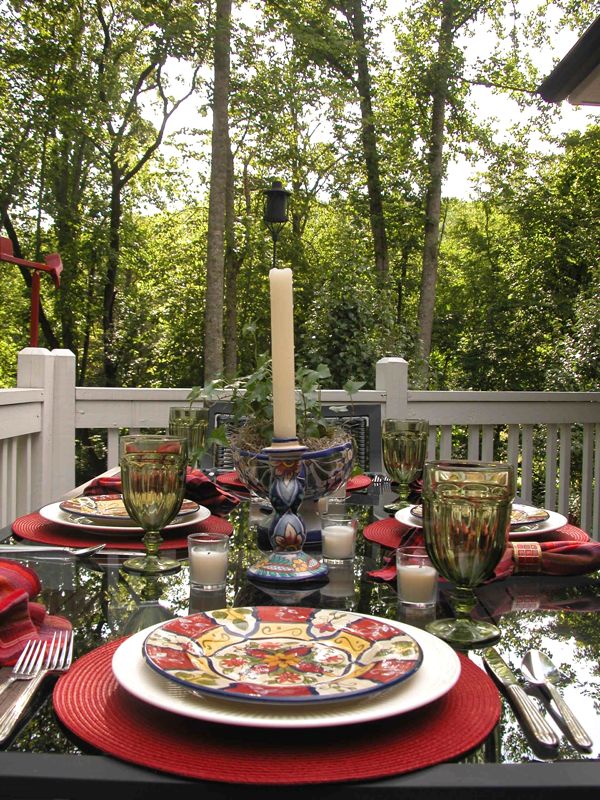
The salad plate is Pier One "Vallarta" paired with a Mikasa "Italian Countryside" dinner plate, and flatware. I think the "Vallarta" goes very well with the real "Talavera" pieces I have.


The napkins and napkin rings are from World Market, and the green glassware is from Walmart. The chargers are from Burke's Outlet.


I am using this Talavera vase for Ivy, and I realized after uploading the photos the dead leaves hanging over the edge!


The candlesticks are also Talavera and from Mexico...


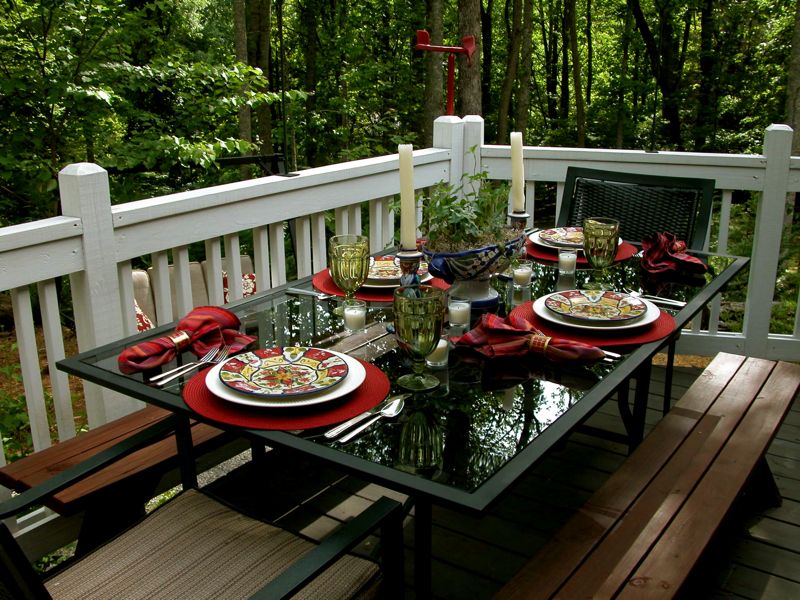
This table is really so simple and only required that I carry out a couple trays to put it all together. I think eating outside should be as nice as eating inside! 

Thanks so much for stopping by today! I have a very exciting giveaway celebrating the 200th anniversary of Pfaltzgraff coming soon, so please stay tuned. In the meantime, you might want to browse their site...

Pfaltzgraff


I'll be joining Susan at BNOTP for "Tablescape Thursday" so be sure to stop by there.

Thanks SO much for stopping by! Each and every comment you leave I read and appreciate, and eventually do my best to get back to:-) I'm usually interrupted by, "Mommmmmmy......"


Wednesday, July 13, 2011

Romantic England breakfast...

Hi everyone! Today we are having breakfast for two on the porch with the J & G Meakin "Romantic England" in pink/red...


The dinner plate features "Haddon Hall" 


The cups feature "Ann Hathaway's cottage" in Shottery, while the saucer features the "Holy Trinity Church" Stratford-on-Avon.


These glasses I'm using for juice were a gift from my mom and from the 1970s I think. I do not know the pattern. The coffee pot, cream and sugar are "Bareuther" of Bavaria and part of a set which includes a small tea pot.


The sterling sugar spoon is Wallace "Louvre" from 1893...


These napkins were a find on ebay last year...


I placed some of the last daylilies in this grocery store milk glass vase...


By the way, if you notice the napkin fold, it should be to the left side and the open corners should all be at the lower right side closest to the forks, although I placed the fork on top because the table is so small. I did not know this until I saw it on a table Susan at BNOTP posted last winter to show incorrect placement. This is done so that it's easier to open. You can see Susan's post HERE.


I hope you enjoy this little table with "Romantic England." These are all things I had ready to go and the table really didn't take a lot of time to put together.

Thanks for stopping by!! I have slowly but surely been getting back to those lovely people who leave comments, it just takes me a while:-)

I'll be joining Susan's "Tablescape Thursday" at BNOTP so be sure to stop by!!

Anita


Wednesday, July 6, 2011

Vintage Hazel Atlas "Pink Crinoline"

From a distance, this table might look suspiciously like my 1956 "Brookpark" table from last week, but I have used another vintage dinnerware pattern. 

My first pink pattern was this Hazel Atlas "Pink Crinoline" or "Ripple Pink" that has been passed down to me. I got a few pieces from both sides of my family, but it is hard to add to as the pieces are kind of expensive and hard to find. 


When I made the placemats for last week's table, I used this floral fabric on the reverse as a lining. All I did was turn them over...


I used again the Colony/Indiana Glass "Whitehall" iced tea glasses along with my mother's 1961 Oneidacraft "White Lily" stainless flatware.


Same flowers from last week...


Here are the same placemats turned back over to the check side...


Since I only have two of the Hazel Atlas bowls, I used these Hocking pink "Old Colony" bowls my mother gave me.


The really cool thing is that my 11-year-old daughter took these photos! She came up with some really nice photos, but her specialty is flowers. We are going to do a post that features her flowers soon.


(I think she is amazing!!)


I hope you see how you can take the same items and reuse them for another look. That's what it's all about for me.  I hope you enjoyed my vintage Hazel Atlas table!! Thanks so much for stopping by!

The girls' room is finished and they have moved back in and put their own touch in there. I'll be showing my version and their version soon!

I'll be joining Susan at BNOTP for "Tablescape Thursday" so be sure to stop by there!

Anita

Sunday, July 3, 2011

Antique Dresser Stripped...

Hi everyone! I hope you are having a great weekend celebrating the birth of our country!! 
I wanted to give you a peak at one of the furniture pieces in the girls' room that I stripped and refinished. This was my grandmother's dresser, and I always loved it. It was always white with gold trim and sat very happily in her pink bedroom. I was lucky enough to get it several years ago. The only before shot I have is this very grainy snap, but you can get an idea of what it looked like.


This was actually the first piece I stripped and refinished. I have to say it was not easy, and I SO wanted to give up. It is a very tedious process, but well worth it if the wood underneath is good. In this case, it was. Here is what I used...I find it at Walmart, but it is available on amazon.com. I have never found this anywhere else. I prefer using products that are water based if possible, and this is just the best, safe stripper I have found.


After several days of stripping, scraping, steel wool, then sanding and coating with polyurethane, here is the finished product...


I used a satin finish because I didn't want shine, and this has held up very well. Unfortunately, I do not have room to use it myself, so my 11-year old, who is named for my grandmother, is using it. She is loving it!


I had to be really careful with this veneer while stripping the paint, but it held up very well.


I hope you've enjoyed seeing my old dresser which has been given a new lease on life! It's part of my "worst room" makeover which I will be posting this week.

Thanks so much for stopping by!! Enjoy your day tomorrow:-)

I'll be joining
Masterpiece Monday at Boogieboard Cottage
Metamorphosis Monday at Between Naps on the Porch
Furniture Feature Friday at Miss Mustard Seed

so be sure to go by there and take a look!!


Saturday, July 2, 2011

The project requires some stripping...

...paint stripping that is! I am still hard at work on the girls' room, and things are going pretty well, but I need to get this little project done to complete it!

I have this antique wash stand that belonged to my grandmother. It has been painted several times. I have wanted to strip it for a while, but never got around to it.


It has a marble top...


When I started sanding, this is what I found. I do love these colors and knowing that my grandmother painted them on kind of connects me to her. She loved painting furniture, and I have spent the last 10 years stripping all that paint!  Knowing how hard people work to get this distressed kind of look made me think about just coating this with paste wax, but it's just not for me, and it wouldn't work in the room. I really enjoy the process of stripping everything down to the bare wood and bringing it back to life. But that's just me...if there's a trend, I'll go the opposite direction for some reason, lol.


So back to work getting this stripped and ready for a finish. Here's a peak at the other piece I stripped and refinished that you will be seeing in the room...


Hoping to have it finished by Monday!! Have a fabulous weekend!!

Anita